Rotational Matrices
Published 4/19/20
I have had a bit of free time lately... which is never a good thing. It usually ends with me getting bored and coming up with a crazy, useless project that I want to complete. In this case I decided I wanted to learn about computer graphics rendering, which is (a) crazy because it's a huge topic and (b) useless because there are already too many smart people working on this problem... So it's seems like I'm right on track!
Then this problem of free time ended up compounding with another problem: My continual frustration with how math is taught. I was trying to get my head around rotational matrices, how, and why they worked. But I couldn't find a source that explained them in a way that worked with my brain.
This post is my attempt to rectify that.
I attempted to explain rotational matrices in a very general, visual way that only requires trigonometry to be able to understand it. I believe all of the mathematics are correct, but I apologize if you find any inaccuracies! Now let's get to it!
Projection
One (less common) way of thinking about rotation is that we are trying to find where our point is relative to a different set of axes.
In the above example we find out where the point is relative to our new set of axes, and then we "unrotate" the axes which moves the point. The act of "unrotating" is essentially redrawing the point in our old plane.
But the question is: how do we find out where the point is relative to the new axis? Some of you may have already guessed that it just takes simple trigonometry =)
The Trigonometry
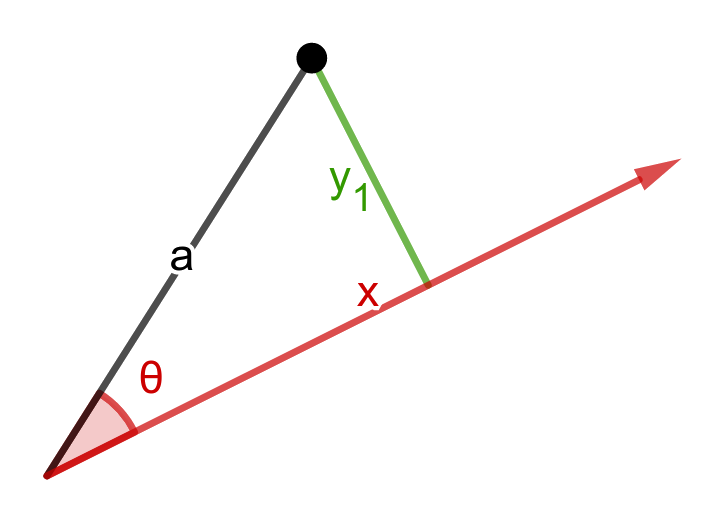
If you have a point and a ray, you can always construct a right triangle.
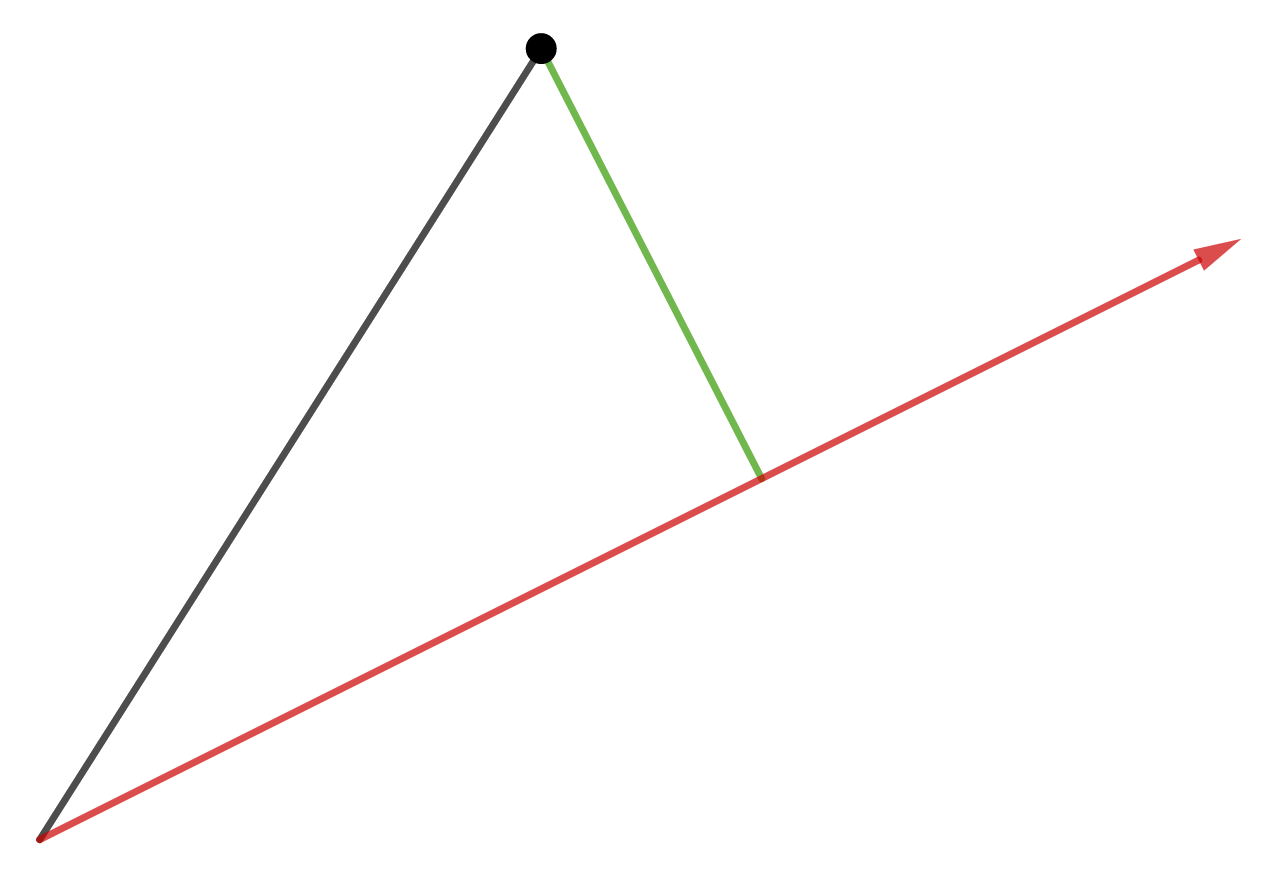
You first draw a line perpendicular to your ray through the point. Then draw a line from the point to the endpoint of your ray.
This is super exciting because once we have a right triangle, we can do trigonometry to it! In our case, we want to figure out the length of that perpendicular line. If we replace the ray with one of our axes from the example above, you'll see why.
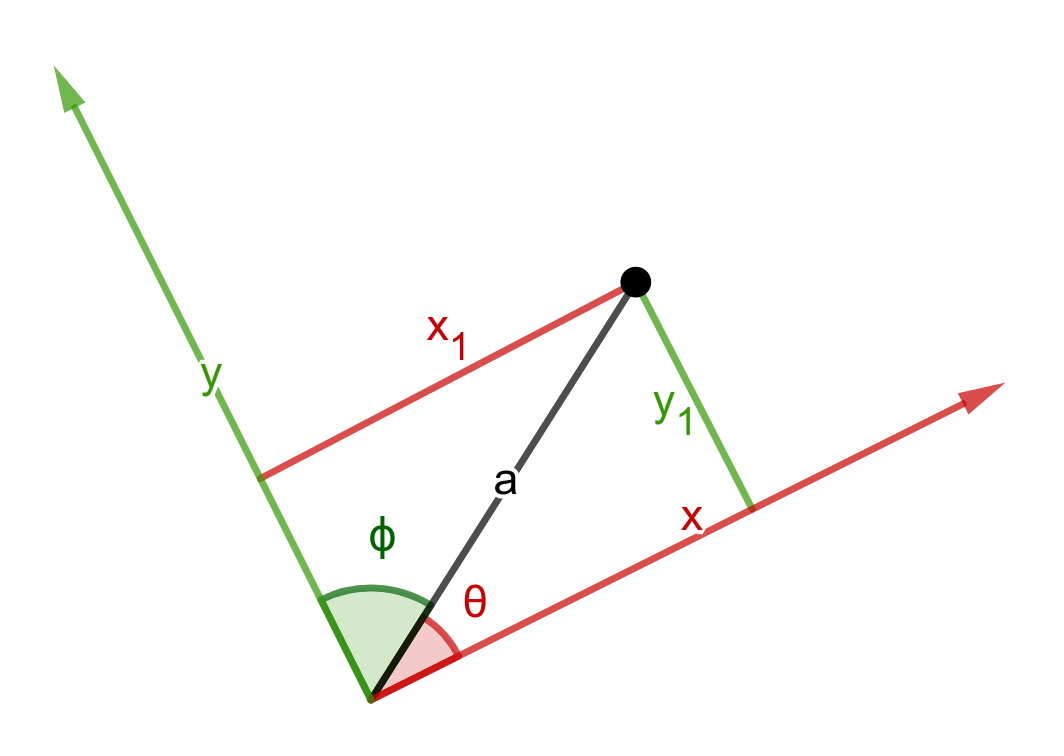
The length of the perpendicular tells us where the point is relative to our axis. This can be found using sines but I'm going to use cosines. $$\color{red}{|x_1|=|a|cos(\theta)}$$ $$\color{green}{|y_1|=|a|cos(\phi)}$$
the \(|a|\) means "the length of a"You'll see why cosines are important in a bit.
Vectors
But first: Vectors! A vector is like ray from the origin to a point. It has a length as well as x, and y coordinates.
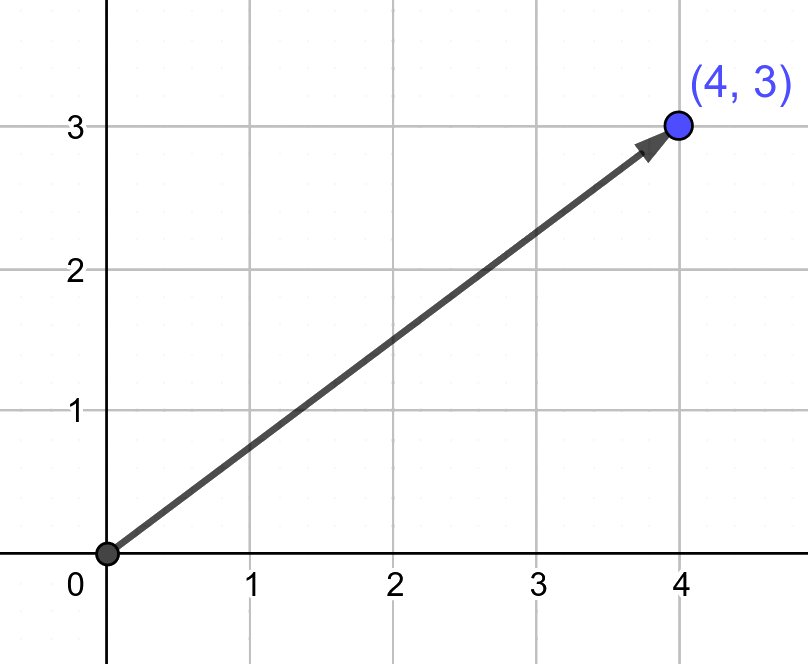
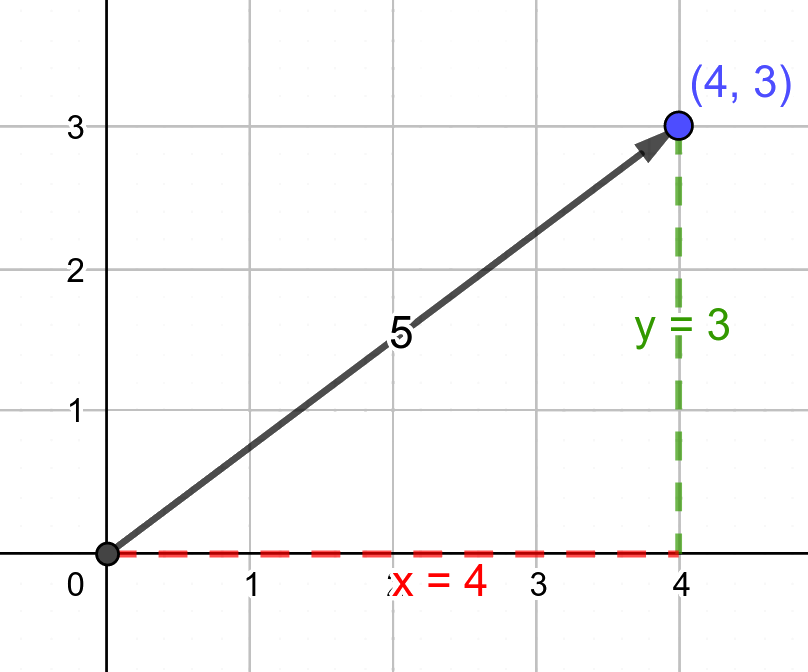
For example, the ray above has the coordinates (4, 3) and a length of 5. You can find the length of a vector by applying the pythagorean theorem: $$ \begin{align} length &= \sqrt{{v.x}^2+{v.y}^2}\\ &= \sqrt{4^2+3^2} \\ &= 5 \end{align} $$
Which makes sense because you can always create a right triangle out of a vector by dropping a perpendicular to the x-axis.
This will be very useful when we go to teach our computer about our coordinate system.
Linear Algebra
Now that we know about vectors, we need to learn a bit of linear algebra. This is because computers are actually pretty bad at doing normal algebra. Instead they use linear algebra, which is easier for them to understand (and for programmers to write).
In linear algebra the input of your function is an ordered set of numbers. For example: $$[1, 0]\qquad[2, 5, 1]\qquad[3]$$ And your function is a matrix. A matrix is just like an ordered set of numbers, but with optional extra columns. $$ \begin{bmatrix} 2 & 6 \\ 9 & 7 \end{bmatrix} \qquad \begin{bmatrix} 3 \\ 6 \\ 2 \\ \end{bmatrix} \qquad \begin{bmatrix} 9 & 27 \end{bmatrix} $$ To find the output of your function you multiply each element of your input by each element of each column of your function, and then add the results together. $$ [1, 0] \begin{bmatrix} 2 & 6 \\ 9 & 7 \end{bmatrix} = [(1 \cdot 2) + (0 \cdot 9), (1 \cdot 6) + (0 \cdot 7)] = [2, 6] $$ $$ [2, 5, 1] \begin{bmatrix} 3 \\ 6 \\ 2 \\ \end{bmatrix} = [(2 \cdot 3) + (5 \cdot 6) + (1 \cdot 2)] = [37] $$ $$ [3] \begin{bmatrix} 9 & 27 \end{bmatrix} = [3 \cdot 9, 3 \cdot 27] = [27, 81] $$
Now let's tie all of our new knowledge together!
The Dot Product
So the reason we used cosines instead of sines above is because of the dot product.
The dot product can be defined in two ways: $$|a|cos(\theta)|b| \qquad (a.x \cdot b.x) + (a.y \cdot b.y)$$
for a proof of this see here (be prepared)As you can see, one of these looks an awful lot like our trigonometry, and the other looks just like our vectors and linear algebra! This is what will allow us to convert our human-friendly math into computer-friendly math.
The only problem is that the left equation doesn't look exactly like our trigonometry. As a refresher it looked like this: $$|a|cos(\theta)$$ Luckily that's not to hard to fix! All we have to do is say we will only work with b vectors of length 1 (which effectively removes b from the left of the equation). $$|a|cos(\theta) = (a.x \cdot b.x) + (a.y \cdot b.y)$$ Note that the b vector does still have to stay on the right side of the equation. This is because there are many b vectors that have a length of 1, but point to different positions. For example: $$(1, 0) \qquad (0, -1) \qquad (0.6, 0.8) \qquad (\sqrt{.5}, \sqrt{.5})$$
But the question remains, what does B actually represent?
Axes
Let's take another look at our original trig diagram from above.
In the dot product function \(|a|cos(\theta)|b|\), \(\theta\) actually means the angle between the vectors a and b. Given this information I think it makes sense that our b vector is the x-axis.
So we have finally arrived at a representation for our rotated axes!
If we make the first row of our function matrix the x-axis ray, and the second row the y-axis ray, we can use that matrix to "rotate" the point.
$$ \begin{align} \color{blue}{A_2} &= (A_1.x, A_1.y) \begin{pmatrix} \color{red}{X.x} & \color{green}{Y.x} \\ \color{red}{X.y} & \color{green}{Y.y} \end{pmatrix} \\ &= (A_1.x \cdot {\color{red}X.x} + A_1.y \cdot {\color{red}X.y}, A_1.x \cdot {\color{green}Y.x} + A_1.y \cdot {\color{green}Y.y}) \\ & \phantom{=} \quad \mbox{^ the above is our dot product ^} \\ & \phantom{=} \qquad \mbox{which is why this results in rotation} \end{align} $$ $$ \begin{align} \color{blue}{A_2} &= (0.6, 0.3) \begin{pmatrix} \color{red}{0.86} & \color{green}{0.51} \\ \color{red}{\mbox{-}0.51} & \color{green}{0.86} \end{pmatrix} \\ &= (0.6 \cdot {\color{red}0.86} + 0.3 \cdot {\color{red}\mbox{-}0.51}, 0.6 \cdot {\color{green}0.51} + 0.3 \cdot {\color{green}0.86}) \\ &= (0.51 + \mbox{-}0.15, 0.15 + 0.51)\\ &= \color{blue}(.36, 0.56) \end{align} $$
Finding Your Axes
Now all we need is a way to take our angle of rotation, and convert that into some new axes. This is pretty simple, because we just need to do trig to it again. If you've ever had to find points on a unit circle, you'll be familiar with this math.
Say we want to define our x-axis as rotated 30 degrees clockwise from where it normally is. We know our hypotenuse has to have a length of 1 to satisfy our decision above. So we can say that: $$ \begin{aligned} cos(\theta)&=\frac{adjacent}{hypotenuse} & sin(\theta)&=\frac{opposite}{hypotenuse} \\ &=\frac{x}{1} & &=\frac{y}{1} \\ cos(\theta)&=x & -sin(\theta)&=y \end{aligned} $$
the y formula is negative because we said this was a rotation of +30 degrees, but the y coord of our x axis actually went down.The same principle applies to finding the y-axis. So our formula for that looks like: $$x=sin(\theta) \qquad and \qquad y=cos(\theta)$$
Putting it All Together
Now we've got all of our pieces. We just plug our formulas for the x and y axes into our function matrix. And walla: working math!